Keg Rebuilding, Pt3
OK, it’s official, keg rebuilding is the worst – though I’m sure it will get better.
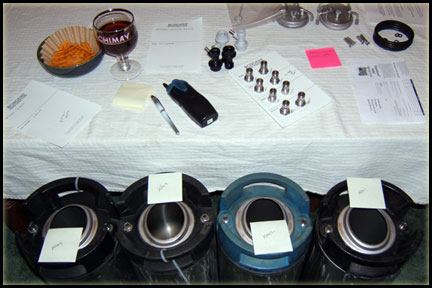
So yesterday I finished rebuilding the four kegs I bought back in the beginning of January. It has taken me until now to get around to it because basically I thought it was going to be hard, boring, and dirty work – and it was. I started actually rebuilding the kegs last Wednesday. That is when I took the kegs apart and cleaned all the little bits. This wasn’t too bad and kind of interesting, and all in all really only took a little more than an hour, actually more. Then I had to order missing gaskets and wait for them to come in. During this waiting period I realized that by mixing up all the keg parts I basically amplified the amount of work I was going to have to do. So on Saturday I sat around and tried to dry fit all of the individual pieces to all of the kegs in hopes to get the best fit. This took quite some time. Then I took the kegs to my friends and spent over an hour and a half cleaning the outside of the kegs.
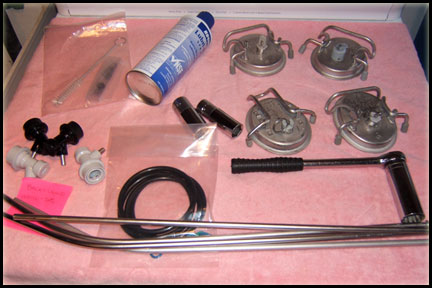
So, now that we’re all up to speed, on Sunday I finished cleaning the inside of the kegs and reassembling them. I started around 1PM and probably finished around 7PM. Most of the time it was like most of the homebrewing chores waiting for things to soak. But when I was physically working it was stressful to me since I really didn’t know what I was doing besides following some paper instructions. Plus the black parts (rubber) of a few of the kegs put off an awful black smear. And, it was almost unavoidable, but I got water everywhere. So I felt stressed, dirty, and wet – yuck! After all the soaking and rinsing I began to put them back together. Two of the four went together great and with no issues. One of the four had very “tight” posts that didn’t want to go on to well, but these posts didn’t want to fit well on any of the kegs while I was dry fitting them. The other keg that was having issues was having lid sitting issues. The lid would not sit tight. Actually it wouldn’t sit tight on any of the kegs. I tried to bend the latch on the lid to make it sit better but it didn’t seem to work. When the keg was put under pressure the lid seemed to hold and is still holding pressure now over 24 hours later.
After the kegs were cleaned and rebuilt I filled them and put them under pressure to see if I could tell if there were any leaks. One of them bubbled slightly on one of the post out puts, but after I depressed it and equalized the pressure it seemed to be fine. So it looks as if they are all put together properly. I then drained the kegs and put them back under pressure to store, under the assumption that it is a less likely environment for “critters” to survive in CO2 then ambient air. I will obviously still sanitize before use.
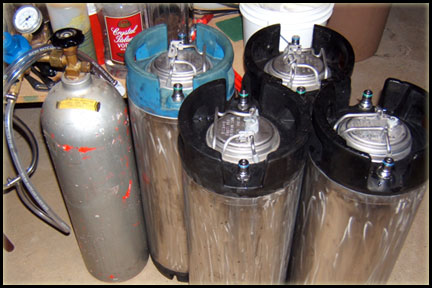
One thing I did notice when pressurizing the kegs while they were full of water had me concerned. My CO2 tank is “T”-ed and there is a line running to two kegs so that I could carbonate twice as much if I so chose. If I relieved the pressure in one keg, the other keg would “suck” water back up the CO2 line and push it into the keg being relieved. OK, no real big deal in this scenario and with water, but what if those were beer, or worse two different beers. So I wonder is there (1) a way to stop liquid from exiting through the gas input of the keg, and (2) if not a way to completely stop it, is there a way to stop it from going into the other keg? Also, some of the kegs I had a real issue pushing on and pulling of the quick disconnects. They really did not want to go in either direction I really had to force them. I don’t know if I was doing something wrong, or if they need to broken in or what, but they were so tight they were actually gouging the new O-rings around the top of the poppets. I didn’t like this one bit. I’m sure I will enjoy kegging in the long run, but for now it seems like a new royal pain in the balls.
March 3rd, 2008 at 9:26 pm
Rebuilding / refurbishing kegs *IS* a big pain in the balls. I do a max of 2 at a time because it sucks so bad.
The gas lines shouldn’t be long enough to where they’d contact the liquid – unless you overfill the keg. I make sure I never put more than 5 gallons in a keg for just the reason you cite…
As for the tight gaskets and having to force the QDs – a little keg lube on those gaskets will take care of that. Getting the disconnect wet will too. If it continues to be difficult, you may want to make sure you haven’t mixed up gas and liquid posts… although that is hard to do for the standard cornies (Gas posts have 12 stars, liquid have 6)…
March 3rd, 2008 at 9:51 pm
Yeah, those kegs were almost full of water so I suppose the gas dip tube was actually in the water, which I suppose wouldn’t be the case with beer – makes enough sense.
Ugh, I hope I didn’t mix up the poppets, that would suck, but I suppose be possible too. What do you mean about the 12 stars and 6 stars thing? Thanks
March 3rd, 2008 at 10:08 pm
I don’t think you need to worry about the poppets – But mismatched posts will make it hard to put a QD on and off. For a standard Cornie, the gas post itself is the one that has 12 points (sorry – I said star, but I meant point). The liquid post has 6 points. If you have any kegs where both posts have 12 or 6 points, then you’ve mixed them up.
I think if you check all 8 posts, the gas QD (probably gray colored) will fit great on only 4 of them – likewise with the liquid QD (black colored).