Tower Conversion 1
So today I began my tower conversion on my kegerator, from one faucet to three!
I have been putting this off since I purchased the thing back in July, so five months. Why the procrastination? Well, I was pretty sure I wanted to widen the access hole in the top of the kegerator to allow more cold air into the tower to keep the beer lines cold, but I was basically a little hesitant about drilling big holes into my new expensive toy. But, finally, the time had come and I was ready (almost) to leap.
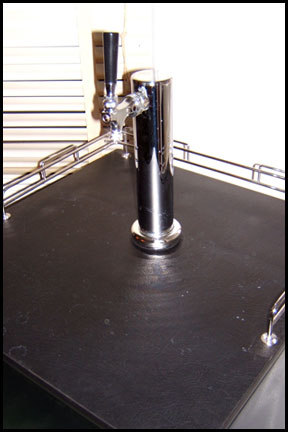
First I needed to prepare. I unplugged the kegerator and took out the two kegs of cider from inside. I then wiped up any moisture from inside. I removed the factory supplied tower easier than I had installed it, but I guess that that’s what happens when you don’t have to force the screws in. Next I put tape around the hole so that I could draw my mark on where to drill. After drawing my first mark and realizing it was off-center, I grabbed a tape measure and redrew my mark more centered.
The next problem was going to be with the tool/method I had chosen to go with. I decided a hole-saw drill bit would be the best solution, but the way these operate is to drill into something (wood for example) and then the drill helps guide and pull the hole-saw through the material. My problem was with the original kegerator hole already there, there was nothing for the bit to bite into. I knew if I could get it started though I’d be OK. So I made a couple poor attempts to get it started and scratched up the laminate surface of the kegerator, but only a little and only right by the hole. I eventually got a bite and really had to lean on the hole-saw for it to go through the particle-board. After the particle-board was some foam, the saw ate right through that, then a sheet of metal.
I think it was stainless steel though I was hopeing it was aluminum. Why do I think stainless steel? Well, the hole-saw couldn’t get a bite (again) and was making things very hot. Well the hotter you get stainless (in this type of scenario) the harder it gets, go I was getting no where fast. I actually set the insulation below the metal on fire, that’s how hot it got. First it started smoking, then sparking, then then next thing I knew I was blowing out a small flame – yikes! To get through the metal I basically had to take a screwdriver and a hammer and chisel/can-opener style make a hole, it was ridiculous. The hole-saw had left a pretty good impression of where the hole should be so I just follow that around with the tip of a flat head screw driver and pounded the heel with a hammer – suckage.
After the metal was insulation (slightly burnt) and then the actual plastic lining of the kegerator, both of these layers were like butter. So basically it was tough to get started and tough to get through the metal half way through, but all in all not to bad. So I wound up widening the hole for the beer lines from 1.5″ to 2.5″. It doesn’t sound like a lot, but I hope it makes a difference. The diameter of the actual new tower is three inches, but there is a layer of foam insulation inside the tower which makes it two and a half, so that’s the measurement I aimed for. Oh, and no coolant lines in the ceiling of the kegerator, which I was worried about.
The main reason I stopped tonight was, one it was getting late, but more importantly is I need to do a minor replacement before I put the new tower back on. The layer of foam below the particle-board and above the metal was only about a 2″x2″ block, so when I drilled through it there wasn’t much left. This then left a two inch gap between the particle-board and metal area of the kegerator, I can only image that would be counter productive of trying to provide coolness.
So tomorrow (hopefully) I will replace the foam layer with a new foam block, cut off the commercial keg connections on the tower beverage lines, drill new holes for the new tower, mount the new tower, connect new liquid quick-disconnects to the the beverage lines, and enjoy a couple beverages. It sounds like it should go quickly, but I know it will take more time than I realize. I turned the kegerator back on to make sure it cools and I didn’t damage anything, I stuffed a towel in the new hole. Also I was hoping to enjoy a couple cold beverages tomorrow, my Traditional Cider, Sweet Cider, and the return of the Gnarleywine.
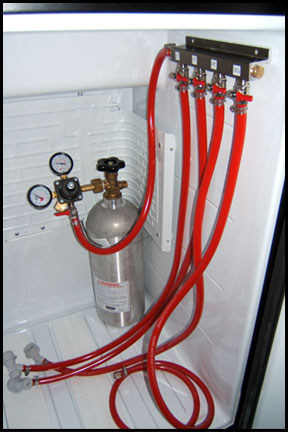
Since I was messing around in the kegerator making improvements I also mounted my gas manifold. This has been rolling around in the bottom of my kegerator since the beginning. I was tempted to drill it into the side of it, but instead I opted for industrial strength Velro, hopefully it holds. I think it’ll fall within the first 24 hours, or not at all, we’ll see. Until tomorrow!


December 8th, 2008 at 8:22 pm
You are a braver man than I. I opted to just live with the 1.5″ opening and having the first slug poured be a little warm and foamy. For most styles that means about 1/2 – 1″ of foam on top, just perfect – but you gotta do the low-foam down the side pour or you get alot more….
December 9th, 2008 at 6:26 pm
Huh you guys are wusses. On mine I bored out the cylinders by 4mm and put in a four barreled Holley carb. Then i spray painted in lime green with purple flames.
Now I can fill a glass in .33 seconds and she’ll do 120 on the interstate…
December 10th, 2008 at 9:04 am
^^ Richard – Funniest, comment, ever! ^^